Fundamental Dimensioning Rules

Reference only, Not for design.
Paraphrased and simplified from ASME Y14.5-2018, Section 4.1. This list is simplified for clarity, it omits important details.
See standard for design data.

  • A) Each feature is required to have a tolerance.
    • Tolerance can be applied to size dimensions.
    • Tolerance may bin in a note or supplementary information.
    • Reference dimensions do not require a tolerance
    • Minimum or maximum dimensions do not require a tolerance.
    • Commercial stock sizes do not require a tolerance.
  • B) Dimensions and tolerances must be complete so as to define the feature without ambiguity.
    • Scaling and assumption of size is not permitted except in certain specialized applications.
  • C) No redundant or duplicate dimensions are allowed. Reference dimensions should be minimized.
  • D) Dimensions should reflect function and mating relationship of the part.
    • Dimensions should not be subject to more than one interpretation.
  • E) Drawings should define the part without specifying manufacturing methods.
    • There are exceptions. See standard.
  • F) Nonmandatory manufacturing processing dimensions should be noted (NONMANDATORY (MFG DATA).
    • For example, shrinkage allowance
    • Final dimensions must be given on the drawing.
  • G) Dimensions should be arranged for optimum readability.
  • H) Dimensions should be shown in true profile to visible lines.
  • I) Products (wire, sheet metal) manufactured to gage or code numbers should be specified in linear dimensions specifying diameter or thickness. Gage or code numbers may be included in parentheses.
  • J&K) A 90° angle is implied (see standard for details regarding tolerance)
  • L) A zero basic dimension applies to concentric features and other coincident features.
  • M) Unless otherwise specified (UOS), dimensions apply at 20° C (68° F)
  • N) UOS, dimensions apply in the free state (unrestrained, compressed or otherwise stressed)
  • O) UOS, tolerances and datum features apply for the full depth, length, and width of features.
  • P) Dimensions and tolerances apply only at the drawing level where they are specified.
  • Q) UOS, the as-designed dimension value does not establish a functional or manufacturing target.
  • R) UOS, Coordinate systems are right-handed. Positive axes must be labeled where coordinate system is shown.
  • S) UOS, elements of a surface include surface texture and flaws (e.g., burrs and scratches).

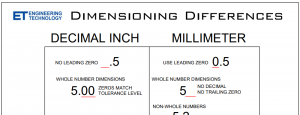
Inch Vs. Millimeter Dimensioning Differences Chart

Inch Vs. Millimeter Dimensioning Differences Chart
There are some important differences between how inch and millimeter dimensions are formatted. This chart is a summary of these sections from ASME Y14.5-2018. Dimensioning-DifferencesDownload

Rules for Dimension Lines

Rules for Dimension Lines
Dimensions lines, along with the arrow heads at their ends, show the direction and extent of a dimension. The dimensions value is placed inside a break in the dimension line or above it, or parallel to it. Never use these as dimension lines: A center line An extension line A phantom line A line that...

Rules for Extension Lines

Rules for Extension Lines
Extension lines indicate where precisely a dimension applies. There should be a short, visible gap between the extension line and the outline of the object. Extension lines are generally drawing perpendicular to the dimension line, but they may be drawn at an oblique angle where space is limited. In general, avoid crossing extension lines or...

Rules for Leader Lines (Leaders)

Rules for Leader Lines (Leaders)
Normally leader lines terminate with an arrowhead. Leaders can refer to a surface when the leader terminates within the outline of the object. In this case, the leader should terminate with a dot. Leaders must extend at an angle, and they must include a short elbow. The number of leaders can be minimized by using...

Reading Direction

Reading Direction
On working drawings, text is generally oriented so as to be read from the bottom of the page (ASME Y:14.5 - 2009). Notes are read from the bottom of the page. Dimensions (other than ordinate dimensions) are read from the bottom of the page. Base Line Dimensions are aligned to be read from the bottom...

Reference Dimensions

Reference Dimensions
Reference dimensions are supplementary measurements provided on an engineering drawing to clarify the size or location of features, but they are not intended to control manufacturing or inspection processes. These dimensions are enclosed in parentheses and serve only as informational aids, often derived from other basic dimensions that already control the design. Since reference dimensions...
Inch Vs. Millimeter Dimensioning Differences Chart

Inch Vs. Millimeter Dimensioning Differences Chart

There are some important differences between how inch and millimeter dimensions are formatted. This...
Rules for Dimension Lines

Rules for Dimension Lines

Dimensions lines , along with the arrow heads at their ends, show the direction and extent of a dimension....
Rules for Extension Lines

Rules for Extension Lines

Extension lines indicate where precisely a dimension applies. There should be a short, visible...
Rules for Leader Lines (Leaders)

Rules for Leader Lines (Leaders)

Normally leader lines terminate with an arrowhead. Leaders can refer to a surface when the leader terminates...
Reading Direction

Reading Direction

On working drawings, text is generally oriented so as to be read from the bottom of the page (ASME Y:14.5...
Reference Dimensions

Reference Dimensions

Reference dimensions are supplementary measurements provided on an engineering drawing to clarify the...